 |
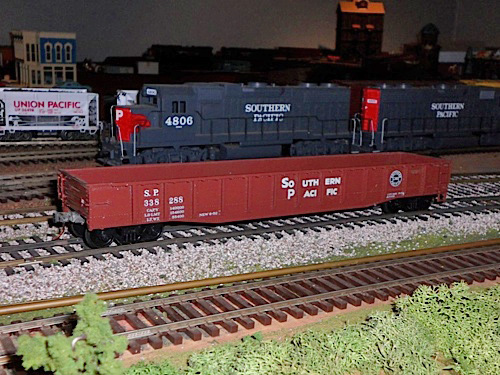
Louisiana, Texas & Pacific Railroad Southern Pacific #338288 |
 any riding railroads include gondola cars. Riding-scale gondolas can haul most anything, including people, tools, buckets, rail, and anything else you can think of. I guess that's why real railroads have so many. The original LT&P plan called for a gondola, and I patterned it after an old Atlas O scale car I acquired in the 1970s.
Gondolas are fairly simple cars, one would think. The frame, floor and sides can be cut and assembled in a day. Then, you have to cut and add the ribs, which takes another day. Then you have to add the top rails on the sides and ends, body bolsters, and ladders (two more full days). I scaled the model up 600% and used internet photos to determine the placement of ladders; my model and the photos had different ladder set ups.
O Scale gondola

Southern Pacific #329739
gondola / Kamela, OR / Matt Adams
Construction
The following manufacturers provided materials for my car:
- Precision Steel Car Co. - ladders, brake parts (brake wheel, reservoir, valve, cylinder, etc.), body bolsters, car ends
- Mountain Car Co. - couplers, roller bearing trucks
- Real Trains - coupler pockets
- Connie Miracle - vinyl lettering
- Lowe's - aluminum stock for frame, ribs and sills, 10-24 screws and nuts, Valspar spray paint, ¼ and ½" plywood
- MicroFasteners - miniature bolts, washers and nuts
The first step was to lay out the frame. I used 3/4" x 3/4" x six-foot square aluminum tubing for the main frame and cross pieces. The bolsters are 3/8" x 2" x 7" steel from PSC, with a tapped 3/8 x 16 hole for the truck mounting screw.
I measured the PSC ends to be sure the floor and sides would fit. The floor is 1/2" plywood, which was cut very carefully to ensure it is square and the edges are straight. The frame and floor were assembled and bolted together. The sides are 1/4" plywood, sealed with two coats of sanding sealer and two coats of brown paint. I had to trim about 1 1/2" off the top of the PSC ends to match the height of the car I was modeling.

aluminum frame

PSC ends
With the sides and ends clamped in place, I drilled the ends and side panels for 4-40 bolts. The lowest hole fits an 8-32 screw, as it goes through the main frame, too.
I laid out the centers for each rib on the car sides. The ribs alternate between 5/8" and 3/4" aluminum. At the centerline of each of the larger ( 3/4") ribs, I drilled a 3/16" hole through the side into the main frame aluminum tubing for a 10-24 x 1 1/4" bolt. This made the side/floor connection very strong.

corner bolts

side ribs
I mounted the Real Trains coupler pockets so they extend past the end of the car to better match the set up in the prototype photos.
I used 3/4" x six-foot aluminum angle for the sills on the inside face of the sides and ends. I ran a 4-40 x 1" bolt through each 5/8" rib to hold the angle in place, then added the outside angles, made from 1/2" stock. I used 4-40 screws here, too, run through the outside 1/2" sill, each 3/4" rib, and the inside sill. Now, the 3/4" angle on the inside of the sides is held in place by a screw on each rib, enhancing its strength. The outside angles do not reach the ends of the car in all my reference photos, so I duplicated this facet of the model.
The photos below show my gondola car with almost all the upper details in place. The brake wheel and housing are complete and painted with all the necessary holes drilled, but it's not installed in the shot on the right (the paint was still drying). However, I still have to assemble the rest of the brake details, including air reservoir, valve, links and cylinder.
When I started this project, I thought it would be easy and take only a couple of weekends. With two full weekends already done, it will take at least one more to finish. On the positive side, James and I put one of our boat seats on a couple of 2x4s and the car seems perfect for this type of seating. The boat seat is almost the exact width as the body of the gondola. It is a quantum leap from sitting on a 1x6.


gondola car / winter 2011

gondola car / winter 2011
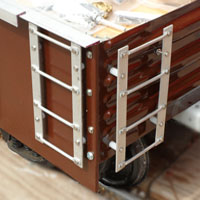
With the body essentially done, it looked very much like a gondola, but still needed details. Even the most basic details change the appearance of a model, but I wanted to add as many details as possible to simulate the look of a real car. I used 1/16" x ½" aluminum for the ladders, with PSC 2 1/2" D-style grabs. The side ladders have 1/4" nylon spacers to hold them away from the sides, while the end ladders have 1/2" spacers.
With the ladders in place, the car looked even better. Unfortunately, I somehow mis-calculated how many grabs I ordered, so I fell one short. PSC also provided the stirrup steps. I used the older-style PSC brake wheel and mounted the housing to the end with 2-56 x 1/4" screws and bolts. I painted the entire housing (inside and out) before I assembled it in the hope that it would prohibit rust. I live within a few miles of the Gulf of Mexico and our seasons tend to be quite damp! At this time I added the 3/4" angle to the tops of each end and the coupler release rod brackets.

corner ladders

underside details
I turned the car over and started the brake details. It took me about two hours to drill holes in the air reservoir, triple valve and cylinder, but the miniature bolts make the parts look great. PSC provided all the brake parts except for the brass rod, which I got from Lowe's.
I used 1/8" brass rod for the brake links and 3/16" rod for the air lines. I soldered the pieces of 3/16" rod together with 1/4" pieces of brass tubing for strength. I also soldered the anglecock valves to the air lines and the smaller lines from the triple valve and reservoir to help them stay put. My knowledge of real trains is limited so I did the best I could in the set up of the lines between the major components. Whether I am right or wrong, it looks very complex! I then formed and added the coupler release rods, made from 1/8" brass.
Painting
I painted the entire under frame with satin black spray paint. I painted the rest of the body, including the inside, with a fresh coat of Valspar gloss brown. This brown is slightly lighter than the Rustoleum I used on an SP hopper project, so even brown cars have some variety. The roller bearing trucks are from Mountain Car Co. They have a heavy-duty look to them and the bearing caps turn as the truck rolls.

painted body

The next day I added Connie Miracle's vinyl lettering. This is only my third lettered model. I have a knack for getting one or two blocks of lettering crooked, but the overall effect is still pretty reasonable. Connie was able to make each block of letters fit the space between ribs. I am very happy with the result. The lettering set included lots of small blocks detailing wheel and brake type, and blocks like "No Step" and "Keep Off." One detail I like best is that she included my home town and the date I started the car in the lettering.
In all, it took about six good days of work to build this car. I plan to use it as I construct more of my railroad and as a riding car. While scratch-building is lots of work, it is nice to stand back and see what you can accomplish.

lettered body